Preparing for the MO-201 Exam
The MO-201 is an advanced official Excel certification created and managed by Microsoft. Passing this exam is a difficult task, which is why those who pass are designated a MOS: Microsoft Excel Expert.
MO-200 vs MO-201 Exams
Here's the big difference between the exams:
The MO-200 exam is more of a basic-level exam that will bring you an Associate level certification. Whereas the MO-201 is an advanced-level exam that will award you with an Expert level certification.
After you've passed the MO-200 exam, you're a Microsoft Excel & Excel 2019 Associate.
But after you've passed the MO-201 Exam, you're a MOS: Microsoft Excel Expert (Office 2019).
To learn everything about the MO-200 exam (from the prerequisites to acing it), read our article on the MO-200 exam.
What is the MO-201 Exam?
The MO-201 is a test designed and conducted by Microsoft to certify your proficiency in Excel.
- Can you manage workbook options and settings to create a spreadsheet for a specialized purpose?
- Are you able to format and validate your data using advanced conditional formatting, filtering, Flash Fill, and other features?
- Can you create advanced formulas using logical functions, lookup functions, date and time functions, and data analysis functions?
- Do you know how to create and modify (record, name, and edit) simple macros.
- Can you create and modify advanced visual charts, Pivot tables, and Pivot Charts.
These are all skills that you would expect an advanced Excel user to have learned from a course, either online (like Excel Exercises), or from through live, in-person training (for example this course from Acuity Training).
Ready to get started? All you need to do is register yourself for the exam. To register yourself for the MO-201:
- Go to Microsoft.com.
- Look for the All Microsoft button on the right.
- Click on it > Click on Microsoft Learn.
- Click on the Certifications tab.
- Go to Browse Certifications.
- Filter for "Office" > "Excel" from the filters on the left, and there you see the MO-201: Microsoft Excel (Office 2019) Certification.
- Click on the link under Certification Exam, and you reach the window where you can Schedule the Exam.
Click on the Schedule Exam button, and you'll be directed to the website of the company that conducts the MO-201 exam (Certiport).
Go ahead and register yourself with Certiport, purchase an exam voucher and you're set to go.
What does the MO-201 Look Like?
Format
The MO-201 test consists of around 5 to 6 projects, with 5 to 6 tasks per project. Expect approximately 30 questions (or tasks) in your exam.
Time
You have only 50 minutes to complete the MO-201 exam, which makes it more challenging.
Pass Mark
To pass, you need 700 or more points out of 1000. That leaves a 30% margin for error.
Fee for the Exam
The basic fee for MO-201 is $100, but it may vary depending on your country.
Exam Mode
The MO-201 exam will be conducted through Certiport; a leading provider of many IT certifications, including the MO-201. As per Certiport, the MO-201 exam can be conducted two ways:
- You can take your exam online (where it will be virtually proctored); or
- You can take your exam in person. To find your nearest exam center go to the Certiport Locator and enter your details. Note that some of these exam centers are independently owned.
Why Take The MO-201 Test?
Taking the MO-201 exam can boost your career in a number of ways:
Certified Expertise
All sorts of organizations need smart data analysts. Microsoft Office Suite skills are essential for many job roles, including data analysts, financial analysts, project managers, and administrative professionals.
A certification directly from Microsoft will put you far above other candidates. The MO-201 certification is an official recognition of your expertise and proficiency in using Excel.
Demonstrate your Excel expertise to employers and clients to win big offers and contracts. The MO-201 certification can specifically help you with the following:
- Getting a job or promotion.
- Better skillset; better offers.
- Makes you more marketable to employers.
- Gives you the confidence to use Excel in your work.
Can be verified and added to your social media profiles
Setting up your profile on any talent hunt site like LinkedIn or Upwork?
Let your certification speak for you. That's the best part about it - you can add it to your profile.
- Go to the Global Credential Verification page of Certiport.
- Add the Credential Identification Code (that appears at the bottom of your certificate).
- After you've added the code, click on verify and the certificate details will be verified. You can also download an online copy of your certificate from here.
Use Excel like a Pro
Preparing the exam alone can be a valuable learning experience. In the process, you'll likely dive deep into various Excel features, functions, and techniques. Even if you're an Excel wizard, this will help you expand your existing knowledge.
What is the MO-201 Syllabus?
The syllabus for MO-201 is made up of four main parts with varying weights.
- Manage workbook options and settings: (15% to 20%)
- Manage and format data: (20% to 25%)
- Create advanced formulas and macros: (30% to 35%)
- Manage advanced charts and tables: (25% to 30%)
The weights define the proportion of each section that you can expect on your test. You can find the syllabus breakdown on the official Microsoft website, in case it changes in future.
| Syllabus Breakdown | Weight | Examinable Areas |
|---|---|---|
| Manage workbook options and settings | 15% - 20% |
|
| Manage and format data | 20% - 25% |
|
| Create advanced formulas and macros | 30% - 35% |
|
| Manage advanced charts and tables | 25% - 30% |
|
How To Prepare For The MO-201
Let's go through some general, yet very crucial tips to prepare for MO-201.
This is an advanced-level exam that requires discipline and commitment.
Microsoft claims that to become a Microsoft Excel Expert, you'd need 150 hours of instructions or hands-on experience using Excel.
Your studying needs will vary depending on your existing expertise in Excel. Following the tips below can help you form a strategy to succeed.
1. Familiarize yourself with the exam structure
Start with reviewing the exam structure first. What does the exam look like? What are the potentially testable areas?
2. Identify skill gaps
The MO-201 exam is an advanced level exam. Make sure you concentrate your efforts on the right things. Critically go through the syllabus guidelines and identify the areas where you lack expertise. Jot them down and focus on them from day 1. We call these areas your "skill gaps". Make sure you identify these weaknesses in the very beginning and work on them until you fee confident!
3. Manage time pressure
80% of those who failed the test list running out of time before they could complete the test as the number one mistake they made.
Remember that the passing score for the MO-201 is 70%. You don't need to be perfect to make this score, but you can only pass if you actually complete the exam. The exam time is only 50 minutes (very tight).
So practice a lot! Learn shortcuts and other ways to work more efficiently.
4. Do lots of practice
The MO-201 is an exam with lots of practical, predictable tasks on it. Unless you have hands-on experience in using Excel, you won't be able to get through the exam.
So don't just rely on theoretical studying or scanning methods to accomplish a task. Practice it! The more practice you do, the better you get at it.
5. Connect with peers and instructors
Engage with others who are also preparing for the MO-201 exam. Join study groups, online forums, or WhatsApp groups where you can ask questions. Collaborating with others can deepen your understanding and provide additional support.
Also, have a dedicated instructor or training program. The MO-201 is a technical exam that necessitates an instructor or structured training program to guide you all the way.
Start with the MO-200 Exam
If this is your first time taking a MOS (Microsoft Office Specialist) exam, we recommend you begin at a basic level. Even if you have expert Excel skills, the MO-201 exam is not all about skills. You also need to deal with external factors like the test environment and time pressures.
Taking a basic test (like the MO-200 exam) will help you familiarize yourself with the interface of the test. And most importantly, it will prepare you for the time pressure of the exam.
MO-201 Exam Practice Questions and Answers
The MO-201 exam is entirely practical. To make sure you get through the exam in time securing a score of more than 70%, you need practice.
The exam generally looks like a package of 5 to 6 projects, and each project would have 5 or 6 tasks to be solved. These tasks come from the areas discussed in the syllabus breakdown above.
Below, let's solve some example tasks to understand how they'll look on the exam.
Task 1
There's a good chance you'll see tasks on the MO-201 exam related to Excel's Flash Fill feature.
In our task below, we have a set of names. A closer look reveals that each name has three parts (the first, the middle, and the last name). Just below that we have a task to separate each part of the name into distinct columns.
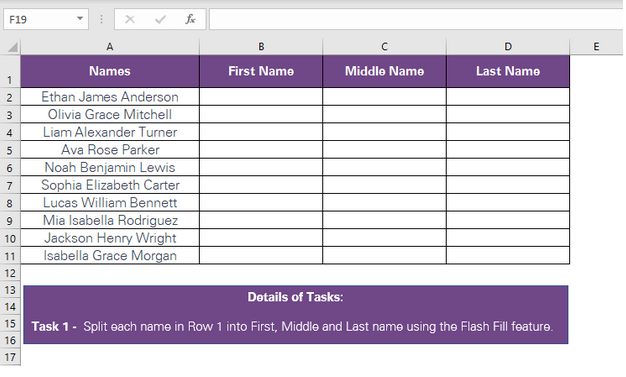
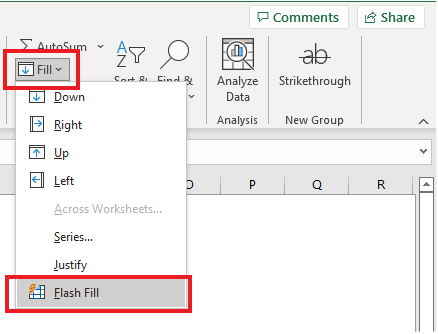
To separate each name into three different columns, follow these steps:
- Select the cell adjacent to the name.
- Type in the first name only. Be careful of the case you use - Excel will copy the case you use.
- Click on the cell immediately under this cell.
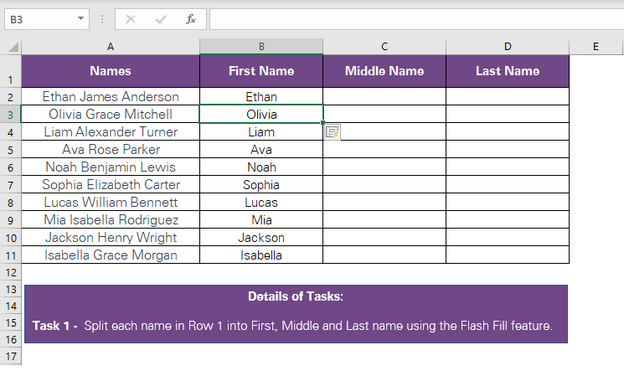
- Go to the Home Tab > Editing group > Fill Icon > Flash Fill button. Excel recognizes the pattern and copies the first name from each name on the left.
- Select the next cell in the same row.
- Type in the middle name only.
- Again use the Flash Fill feature as described above.
- Select the next cell (the fourth cell) in the same row.
- Type in the last name only.
- Use the Flash Fill button again.
Task 2
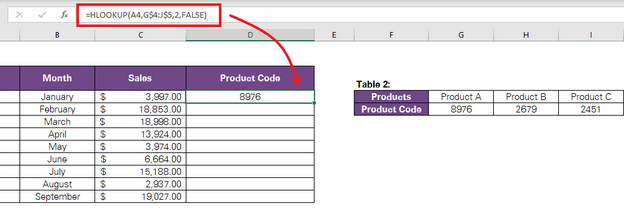
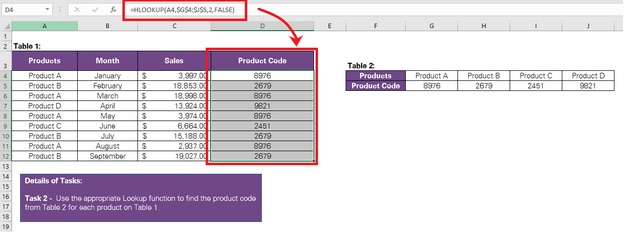
Moving on to the next task. Below we have a task related to information on some products with a vacant list of product codes in Table 1.
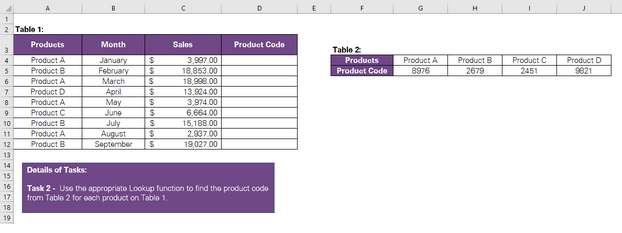
The task asks us to use the appropriate Lookup function and populate the Product Codes from Table 2. This task comes from the syllabus portion of Creating Advanced Formulas > Lookup Functions.
To solve this, we must know the Lookup functions in our syllabus i.e. VLOOKUP, HLOOKUP, XLOOKUP, INDEX, and MATCH functions.
Because the lookup range (table 2) horizontally contains the codes by product, the appropriate function here is the HLOOKUP function.
- Select cell D4 (to populate the Product Code).
- Start the HLOOKUP function as follows:
=HLOOKUP( - Define the lookup value as A4 (the value to be looked for is the Product name in Table 1).
- Define the lookup range as G4:J5 (the range where the lookup value and result are to be looked up).
- Write 2 for the third argument (the row in the lookup range where the result is).
- And finally, specify whether you want an approximate match to the lookup value. We have written FALSE for an approximate match as the exact product names appear in Table 2.
- Your HLOOKUP formula should like this:
=HLOOKUP(A4, G4:J4, 2, FALSE). Hit enter to get the results.
Pro tip: Don't just drag the formula as it is. It contains relative references that will be updated as the formula is dragged. Turn the lookup range into an absolute reference because we do not want it to change as we drag the formula to new cells.
To turn a relative reference into an absolute reference, click on the cell reference in the formula and press the F4 key.
Here's what the formula finally looks like: =HLOOKUP(A4, $G$4:$J$5, 2, FALSE). Now you can drag the formula to the cells below to get the product codes for each of the products in the list.
Task 3
Here is task 3:
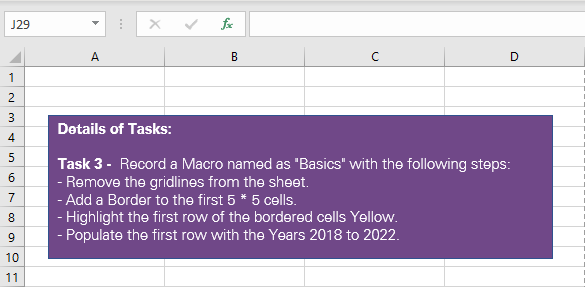
This task simply asks us to record a macro with a few specific steps, name it, and save it in the workbook. Macros are a very important part of the MO-201 syllabus and you can expect them on your exam. To solve this task, follow the steps below:
- Go to the Developer tab > Record Macro.
- Set the Macro name to "Basics" as shown below.
- Perform the steps mentioned in the task: remove the gridlines, add borders, etc.
- Once the macro is recorded, click on the "Stop Recording" button under the Developer tab.

The Macro will be saved and you can view it under the macros of your workbook. And that's it - the task ends here. But just to check, does the macro work as intended? Let's see it in action to make sure.
We've inserted a new sheet and run the macro on it. Note that the same formatting (as recorded in the macro) is applied to the new sheet. This tells us we've correctly recorded the macro.
Task 4
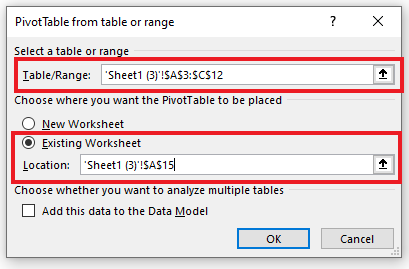
The final (and the most complicated) task on this list is to create a Pivot Table. The image below has some products with their sales over three years (2021 to 2023). The task here requires making a Pivot Table to find the total sales for each product in each year.
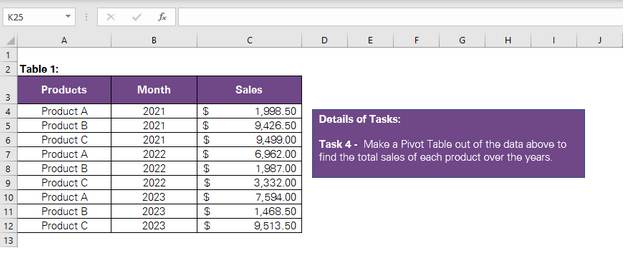
- Select the data to be put into a Pivot Table.
- Go to the Insert tab > Pivot Table.
- Make selections of the following fields as shown below.
- Click okay to create the Pivot table. The fields will appear on the right top of your sheet as below.
- Now, because we want the total of each product's sales, we will drag the field "products" to rows. "Sales" go to Values, and "Month" goes to Columns.
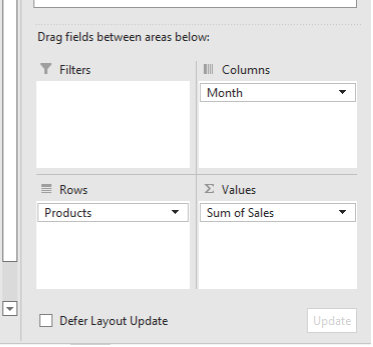
Our Pivot Table is now ready. It gives a concise view of the sales of each product each year.
If you were able to confidently complete these Excel tasks, your skills likely only need some brushing up before you can take the exam.
Pro tip: Each project in your exam will have a mix of tasks that relate to different areas of the MO-201 skills outline. It might require creating logical formulas, using lookup functions, creating advanced graphs or pivot charts, etc. The task set above is only an example of how tasks might be designed for a MO-201 exam. It must not be regarded as a conclusive list of tasks to appear on the MO-201.
Summary
The above guide is meant to give you a comprehensive overview of the MO-201 exam - from registering for the exam to preparing for it.
To be certified as an Excel expert, you'd need expertise in many Excel fields. Acing the MO-201 is all about bringing together the right mix of knowledge and practice.
Keep practicing, and good luck!